How to Add Custom Content on a Receipt
This blog will explain about how to add a custom content in a Receipt which will be generated from MPOS in Microsoft Dynamics.
Microsoft provides us with certain fields which can be put into the receipt. There are certain fields which a client will ask to show in the receipt. If the desired field is not available in the standard receipt designer, we have to customize it. This document will explain about how to add the custom field in AX and then pushing it to the channel DB and then binding it in MPOS code.
You can add custom fields in AX and bind it in the code in Modern POS.
1. Add Custom Fields in AX. This process is same as we used to do for Enterprise POS.
Lets take example of adding barcodes for the items in the receipt. Go to Retail>Setup>LanguageText>Click New>Add Barcode.

Above screenshot contains the information about how to add the language text before adding Custom field in AX.
Now go to Retail>Setup>Custom Fields>Add Barcode. Select Type as Receipt.
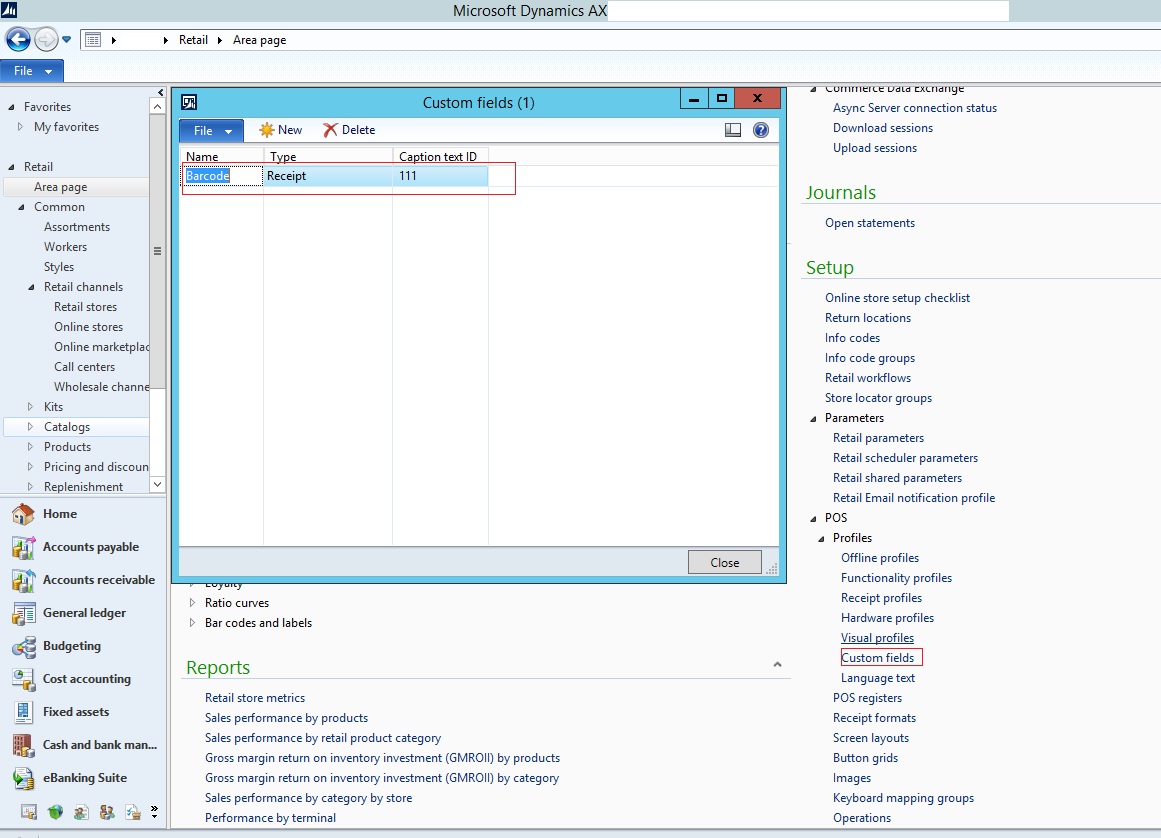
Above screenshot is about adding the Custom fields in AX.
Add Barcode in the Lines Section of the Receipt designer.
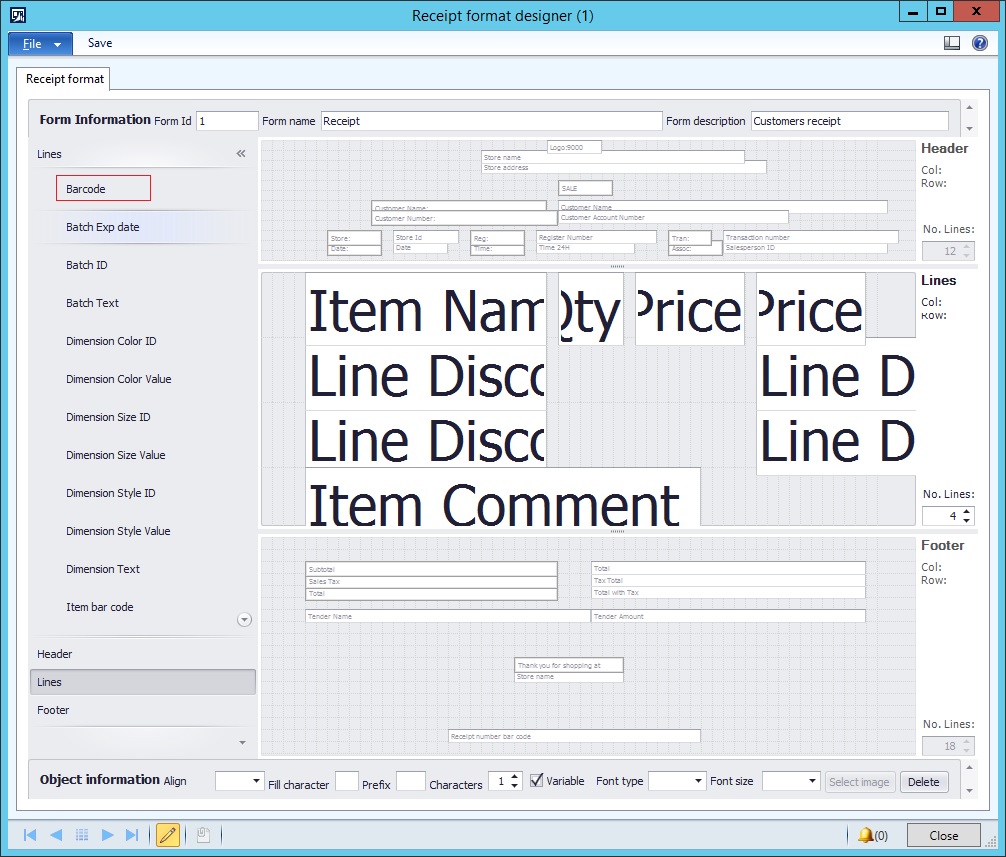
Above screenshot shows the customized barcode control on the right side. This should be selected and placed at lines section of the receipt.
After placing the control at desired location, save the receipt.
Now run job 1090 from distribution schedule. This will Push the customized receipt to the Channel DB.
2. Now We will look upon the Retail SDK.
For any customization in MPOS where we have to get data from the database or save data into database, we need to write a Request Class, Response Class and Handler Class. For all these class code is written on CommerceRuntimeSDK(This is part of RetailSDK).
Open the sdk.SqlserverDataservice project and add classes.
For this particular customization, Request class will be like this:
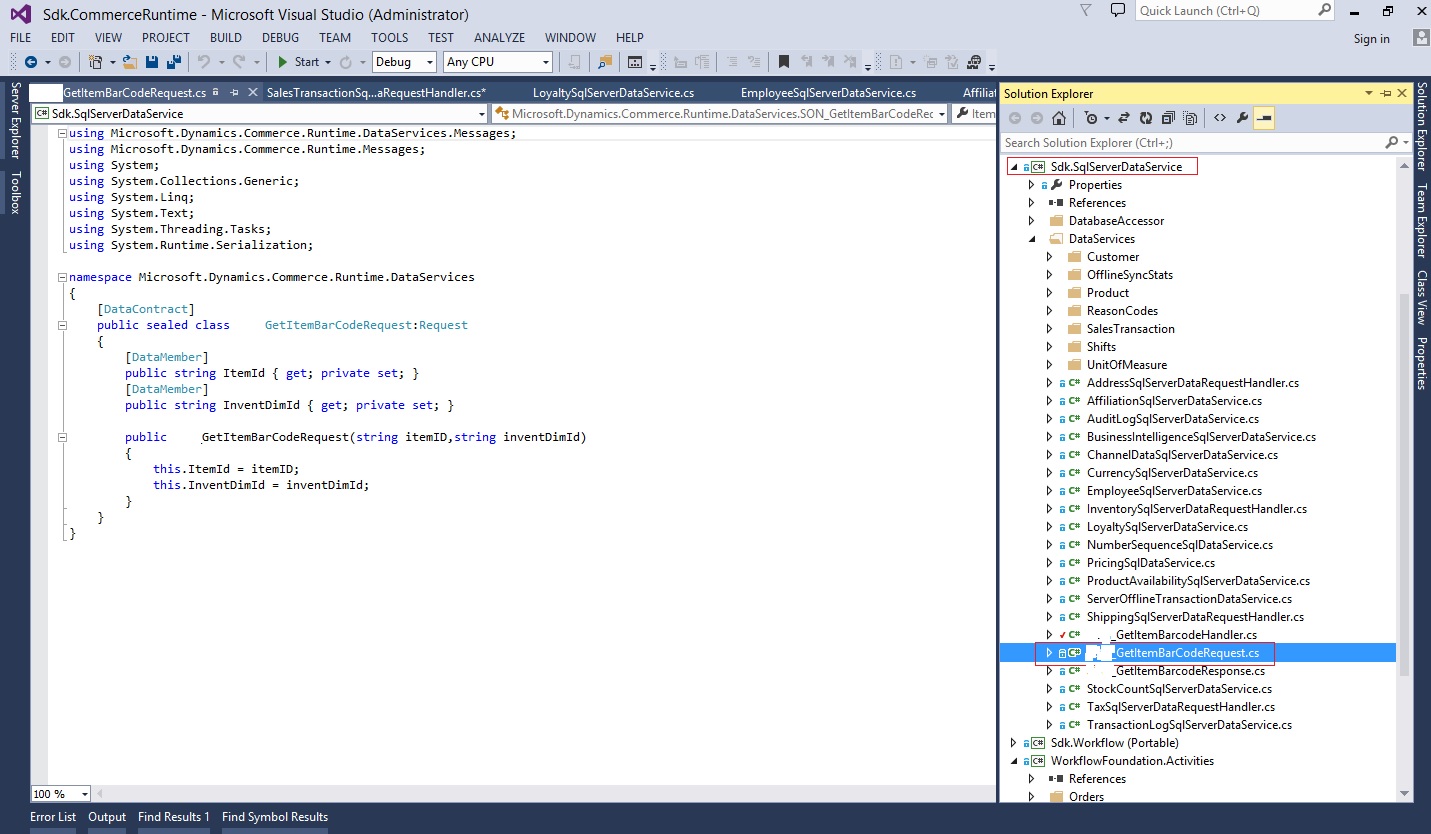
Above screenshot is the request class which is created to handle the request in CRT.
Response class is like this:
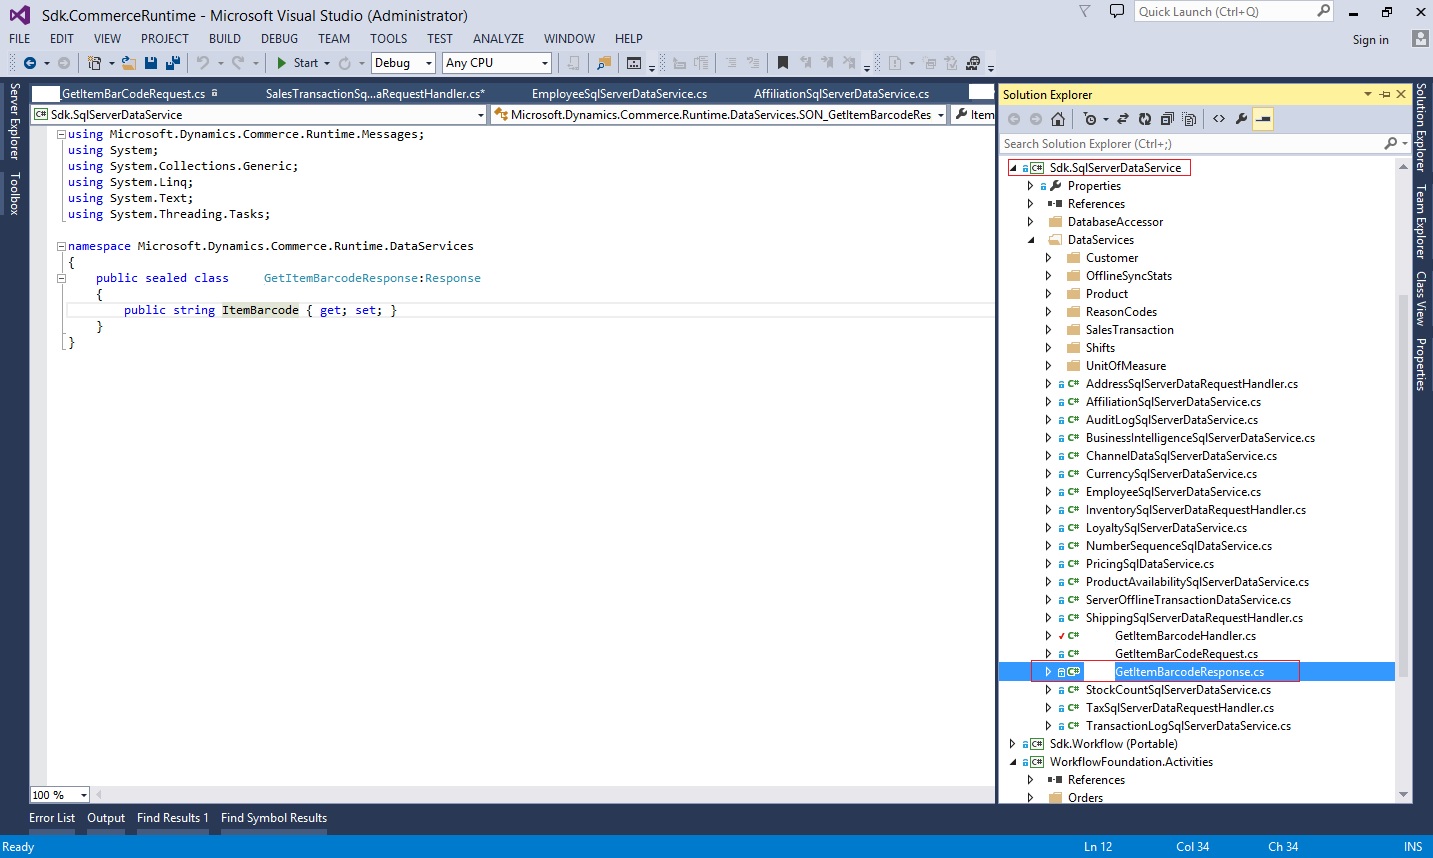
Above screenshot is the response class which is created to handle the response in CRT.
Code for the Handler Class is as follows:
 namespace Microsoft.Dynamics.Commerce.Runtime.DataServices
 {
 public class GetItemBarcodeHandler:IRequestHandler
 {
 public IEnumerable<Type> SupportedRequestTypes
 {
 get { yield return typeof(GetItemBarCodeRequest); }
 }
 public Response Execute(Request request)
 {
 if (request == null)
 {
 throw new ArgumentNullException(“request”);
 }
 Response response = null;
 Type reqType = request.GetType();
 if (reqType == typeof(GetItemBarCodeRequest))
 {
 response = GetItemBarcode((GetItemBarCodeRequest)request);
 }
 else
 {
 string message = string.Format(CultureInfo.InvariantCulture, “Request ‘{0}’ is not supported.”, reqType);
 throw new NotSupportedException(message);
 }
 return response;
 }
 private GetItemBarcodeResponse GetItemBarcode(GetItemBarCodeRequest request)
 {
 ThrowIf.Null(request, “request”);
 SqlServerDatabaseContext sqlServerDatabaseContext = new SqlServerDatabaseContext(request.RequestContext);
 if (!string.IsNullOrEmpty(request.ItemId) && !string.IsNullOrEmpty(request.InventDimId))
 {
 return new GetItemBarcodeResponse() { ItemBarcode = GetItemBarcodeforItem(request.ItemId, request.InventDimId, sqlServerDatabaseContext).ToString() };
 }
 else
 {
 throw new ArgumentException(“Barcode not available.”);
 }
 }
 private string GetItemBarcodeforItem(string itemId, string inventDimId, SqlServerDatabaseContext sqlServerDatabaseCon)
 {
 string barCode = string.Empty;
 ParameterSet parameters = new ParameterSet();
 parameters[“@ItemId”] = itemId;
 parameters[“@InventDimId”] = inventDimId;
 string selectQuery = @”DECLARE @Count INT
 SET @Count=(SELECT COUNT(*) from ax.INVENTITEMBARCODE WHERE INVENTDIMID=@InventDimId and ITEMID=@ItemId)
 IF(@Count!=0)
 BEGIN
 select ITEMBARCODE from ax.INVENTITEMBARCODE WHERE INVENTDIMID=@InventDimId and ITEMID=@ItemId
 END
 ELSE
 BEGIN
 SELECT ‘None’ AS ITEMBARCODE
 END”;
 var sqlQuery = new SqlQuery(selectQuery, parameters);
 barCode = sqlServerDatabaseCon.ExecuteScalar<string>(sqlQuery);
 Trace.Write(barCode);
 return barCode;
 }
 }
 }
After putting the code in the respective class, build the dll and update in the bin folder of the retail server. This will help in exposing the code in the services project.
Now Come to the sdk.services project and open Receipt folder. There is a class called ReceiptService.cs inside the folder.
Add the below mentioned code in the class:
 private static string GetItemBarcode(string itemId, string inventDimId, RequestContext context)
 {
 string returnValues = string.Empty;
 ChannelDataManager channelDataManager = new ChannelDataManager(context);
 long ChannelId = channelDataManager.Context.GetPrincipal().ChannelId;
 GetItemBarcodeHandler obj = new GetItemBarcodeHandler();
 var request = new GetItemBarCodeRequest(itemId, inventDimId);
 GetItemBarcodeResponse response = context.Execute<GetItemBarcodeResponse>(request);
 if (response != null)
 {
 returnValues = response.ItemBarcode;
 }
 return returnValues;
 }
Goto GetinfofromSalelineItem method and write below mentioned code as show in the image:
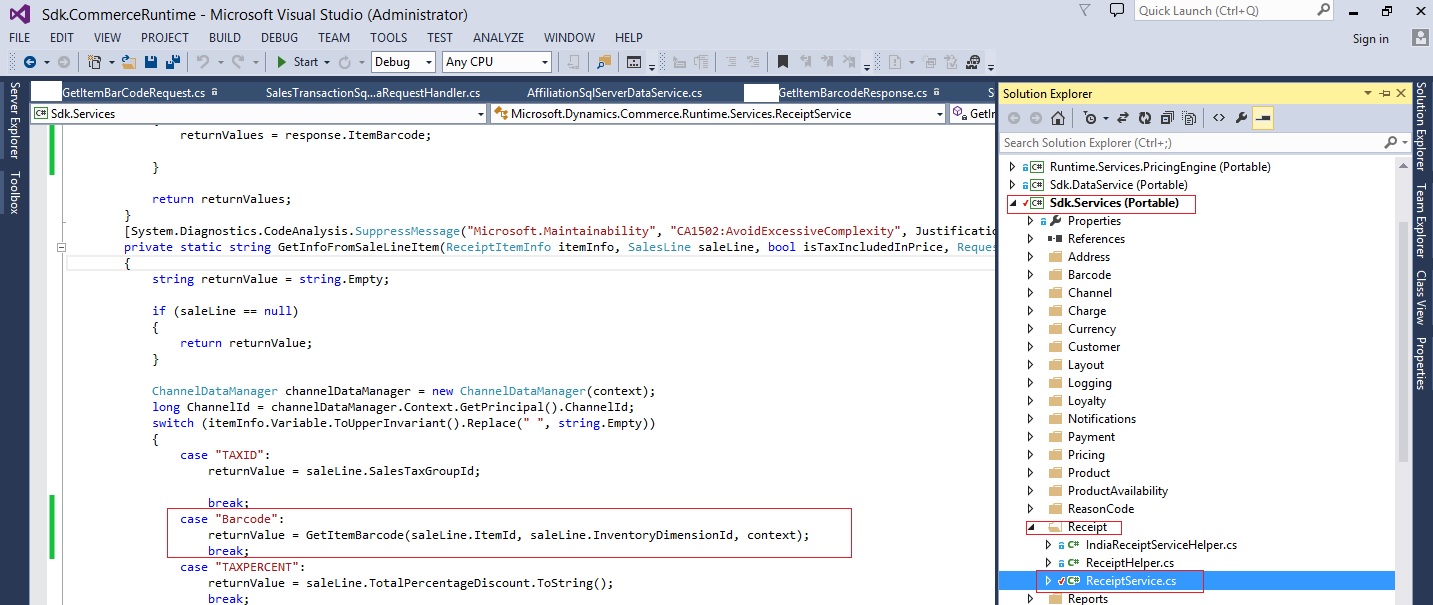
Build the project and put the dlls in the retail server bin folder and Run MPOS. Please make sure that the dlls are placed properly. If the dlls are not placed properly then customization will not be available.
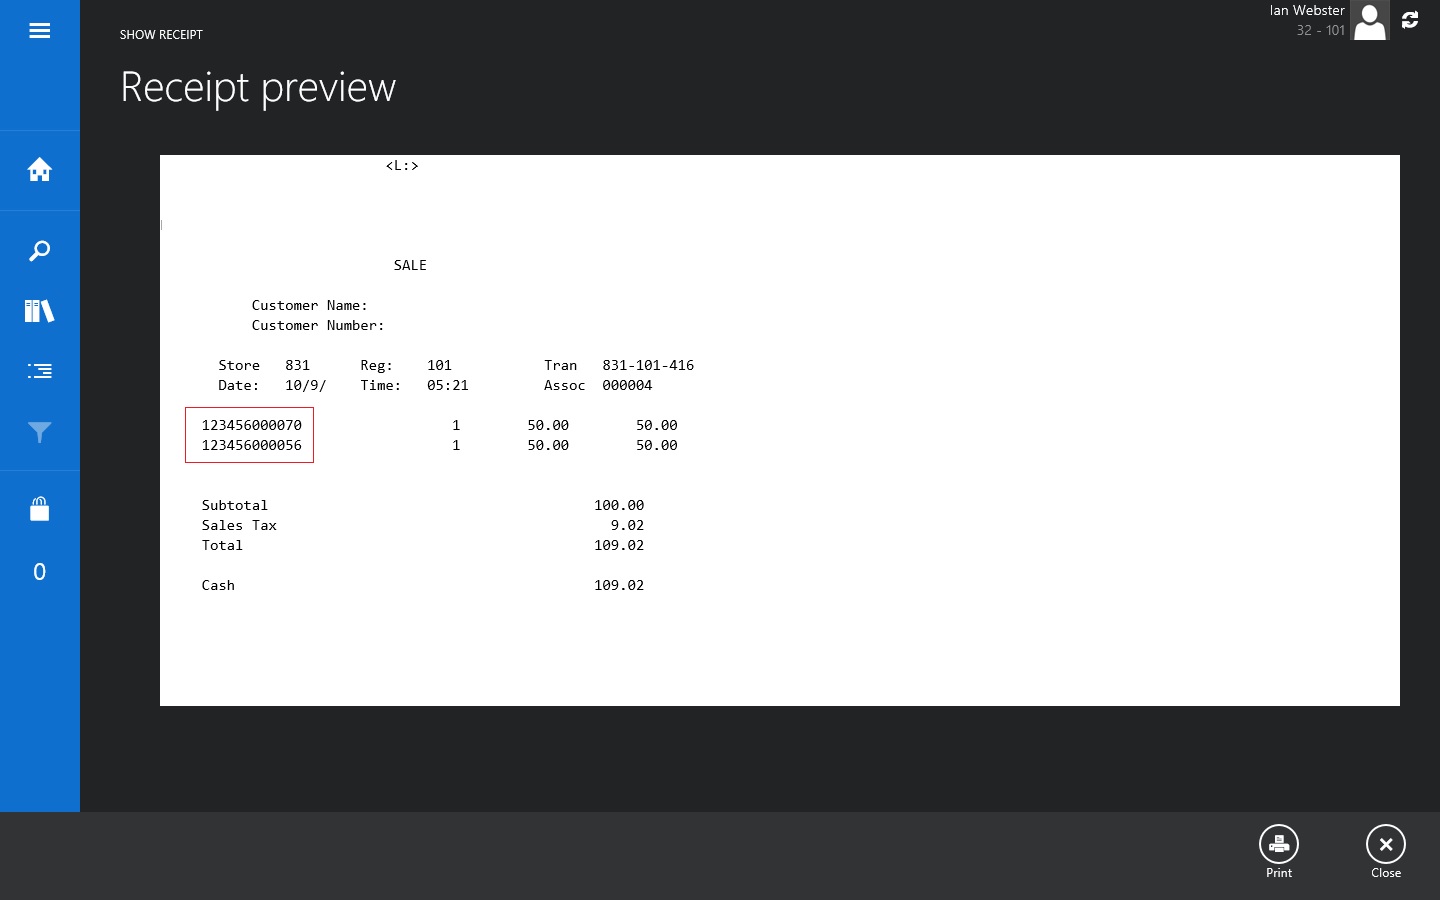
Barcode shown in the Receipt.
Conclusion:
The document helps you in showing any custom field on the receipt. There are certain fields which are available in the Receipt toolbox but still does not contain the implementation. With the help of this document, developer can achieve the results. If you have not understood any point discussed in this post, ask our dynamics AX consultants in comments. They will answer you shortly.

This information is very usefull for us. We are trying the same for Cloud POS. We have added the custom field but the custom field doesnot show up on our Receipt. Can you help us on this??