A Beginners’ Guide to x86-64 Instruction Encoding
The encoding of x86 and x86-64 instructions is well documented in Intel or AMD’s manuals. However, they are not quite easy for beginners to start with to learn encoding of the x86-64 instructions. In this post, I will give a list of useful manuals for understanding and studying the x86-64 instruction encoding, a brief introduction and an example to help you get started with the formats and encodings of the x86-64 instructions. For further more details, you may go on to read the reference documents listed using the technique shown in this post.
AT&T Syntax and Intel Syntax
Before you move on to following parts, let’s make clear of one especially confusing part for beginners about the assembly syntax when you read various documents: there are AT&T syntax and Intel syntax. In Intel documents, it is usually in Intel syntax. With GNU tool chains on Linux, the default syntax used is usually the AT&T one.
The most significant different between these 2 syntaxes is that AT&T and Intel syntax use the opposite order for source and destination operands. Intel syntax uses “dest, source” while the AT&T syntax uses “source, dest”. Note that instructions with more than one source operand, such as the enter instruction, do not have reversed order. For the representation of operands with the SIB or displacement, the formats are different. For example, the Intel syntax is [rdi+0xa] for 0xa(%rdi) in AT&T syntax. For a list of notable differences, please check AT&T Syntax versus Intel Syntax.
Reference documents for x86-64 instruction’s encoding
Here is a list of references and useful documents I will refer to in this post and you can further check later too to encode more instructions.
- x86-64 (and x86) ISA Reference from Intel and AMD’s x86-64 (and x86) ISA Reference are the authoritative document here. Especially,
- the Intel 64 and IA-32 Architectures Software Developer’s Manuals‘ “CHAPTER 2 INSTRUCTION FORMAT” is a good starting point. There are also references for each instruction.
- the Intel 64 and IA-32 Architectures Software Developer’s Manuals‘ “APPENDIX B INSTRUCTION FORMATS AND ENCODINGS” is a good reference.
- x86-64 Instruction Encoding is another very good page from OSDev as a quick reference.
Tools and tips for finding out an x86-64 instruction’s encoding
To quickly find out the encoding of an instruction, you can use the GNU assembler as and the objdump tool together. For example, to find out the encoding of the instruction addq 10(%rdi), %r8, you can do it as follows.
First, create a file add.s containing one line
addq 10(%rdi), %r8Second, assemble the add.s to and object file by
$ as add.s -o add.oLast, deassemble the object file by objdump -d by
$ objdump -d add.oIt will print out
add.o:     file format elf64-x86-64

Disassembly of section .text:

0000000000000000 <.text>:
   0:   4c 03 47 0a             add    0xa(%rdi),%r8
Here 4c 03 47 0a is the 4-byte encoding of the addq instruction.
If you want to check the instructions in Intel syntax, you may do
Last, deassemble the object file by objdump -d by
$ objdump -d --disassembler-options=intel-mnemonic add.oYou will get
add.o:     file format elf64-x86-64

Disassembly of section .text:

0000000000000000 <.text>:
   0:   4c 03 47 0a             add    r8,QWORD PTR [rdi+0xa]
Brief introduction to x86-64 instruction encoding
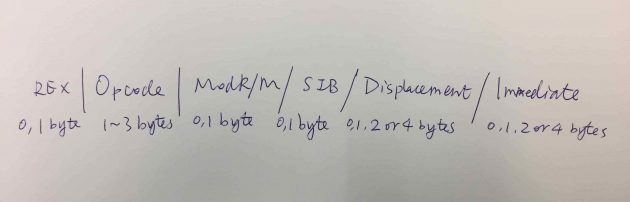
The x86-64 instructions are encoded one by one as a variable number of bytes for each. Each instruction’s encoding consists of:
- an opcode
- a register and/or address mode specifier consisting of the ModR/M byte and sometimes the scale-index-base (SIB) byte (if required)
- a displacement and an immediate data field (if required)
An example: manually encode an x86-64 instruction
Let’s take a look at the encoding of an instruction add r8,QWORD PTR [rdi+0xa] (in Intel syntax) in the previous part. Let’s see how it is encoded to 4c 03 47 0a.
From the “add” instruction reference from “ADD”, “INSTRUCTION SET REFERENCE” in the ISA reference Volume 2A., find the line for the encoding of the ADD r64, r/m64 corresponding to this instruction
Opcode      Instruction     Op/  64-bit Compat/   Description
                            En   Mode   Leg Mode
REX.W+03/r  ADD r64,r/m64   RM   Valid  N.E.      Add r/m64 to r64.
and, from the REX description
In 64-bit mode, the instruction’s default operation size is 32 bits. … Using a REX prefix in the form of REX.W promotes operation to 64 bits.
So, we get
REX.W = 1The ‘R’, ‘X’ and ‘B’ bits are related to the operand encoding (check “Table 2-4. REX Prefix Fields [BITS: 0100WRXB]” of the reference volume 2A).
REX.X bit modifies the SIB index field.
SIB is not used in this instruction. Hence,
REX.X = 0Let’s further look at the encoding of the operands. From the “Instruction Operand Encoding” for the add instruction:
Op/En Operand 1      Operand 2    Operand 3 Operand 4
RM    ModRM:reg(r,w) ModRM:r/m(r) NA        NA
There will be 2 operand parts for the RM encoding. The first part will be ModRM:reg(r,w) and the second part will be ModRM:r/m(r). “Figure 2-4. Memory Addressing Without an SIB Byte; REX.X Not Used” from Volume 2 shows the encoding for this case.
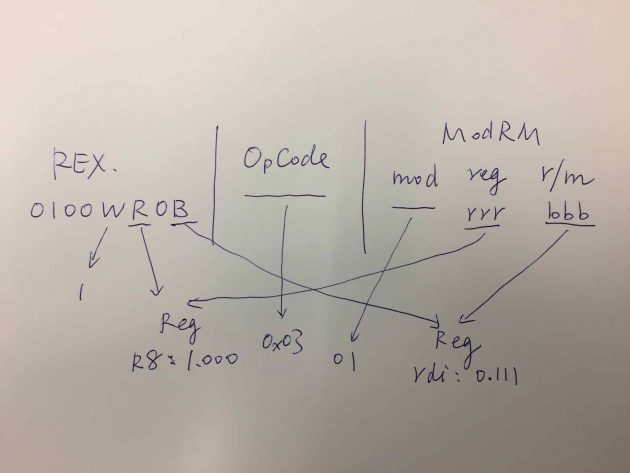
The REX.R and REX.B bits and the ModeRM byte will be decided accordingly. There are 3 parts in the ModRM byte: ‘mod’, ‘reg’ and ‘r/m’.
There is a table “Table 2-2. 32-Bit Addressing Forms with the ModR/M Byte” (it is for 32-bit operands. But from 2.2.1.1, “In 64-bit mode, these formats do not change. Bits needed to
define fields in the 64-bit context are provided by the addition of REX prefixes” and hence the same value can be used) in Volume 2 which shows mapping of the operands combinations to the bits values of ‘mod’.
Although the table applies to 64-bit modes too, it does not show the additional registers like r8. Hence, we only use it to find out bits for ‘Mod’ only for the addq instruction we are encoding it. As 0xa can be encoded in a byte, we can use disp8 to keep the instruction encoding short. From the row of [EDI]+disp8 (actually, all disp8 ones share the same ‘Mod’ bits),
Mod = 01 (in bits)For the encoding of the registers, I compiled a table for the general purpose 64-bit registers for your reference:
_.Reg  Register
----------------
0.000   RAX
0.001   RCX
0.010   RDX
0.011   RBX
0.100   RSP
0.101   RBP
0.110   RSI
0.111   RDI
1.000   R8
1.001   R9
1.010   R10
1.011   R11
1.100   R12
1.101   R13
1.110   R14
1.111   R15
The ‘‘ in the ‘.Reg’ are usually a bit in the REX prefix, such as REX.B and REX.R, depending on specific instructions and operand combinations.
For the addq instruction in this case, r8 is 1.000 and rdi is 0.111. Hence, in bits, we get
reg = 000
r/m = 111
REX.B = 0 (from `rdi`)
REX.R = 1 (from `r8`)
Now, let’s put them together.
By putting the ‘WRXB’ bits ([BITS: 0100WRXB]) together, we get the REX prefix for this instruction is
0100 1100Together with the 03 in REX.W+03/r from the reference for the ADD instruction, the opcode part, in hexadecimal, is
4c 03By putting the mod, reg and r/m together, we get the ModRM byte (in bits)
01 000 111which is, in hexadecimal,
47Following the ModRM byte is the displacement is 0xa(10‘s hexadecimal representation) in one byte (disp8).
Putting all these together, we finally get the encoding of add r8,[rdi+0xa]:
4c 03 47 0aIn this example, to show the process, I have shown how to manually do an instruction’s encoding which is usually done by the assembler. You may use the same method to encode all other instruction by checking the reference documents for details of every instruction/operand combinations’ cases. Enjoy low level system programming!
the displacement byte is useless here right?
the displacement byte is useless right?
what is the displacement byte doing here?
The displacement byte is the last byte `0a` from `4c 03 47 0a`.