How to synchronize Google Drive and Google Docs files in Ubuntu/Debian/Mint Linux using Insync
Google Drive is a nice cloud storage service. It provides a suite of nice online document spreadsheet and slide editors Google Docs, Google Sheets and Google Slides. The collaborative editing and full history tracking features of Google Docs are excellent. Google Drive gives 16GB free storage which is pretty much larger compared to other free cloud storage plans. However, there has never been an official client released for Linux. The best Google Drive client which I find recently that works smoothly and nicely is a software product Insync. We will check how to install and use it in Ubuntu/Debian/Mint Linux in this post.
There are other choices for syncing Google Drive files, such as Gnome Online Accounts. Insync has its unique features available that are useful. Unlike Gnome Online Accounts, Insync files are visible and available in the local file system following the directory structure and file names in Google Drive instead of some “virtual” file systems only available to Nautilus, and Insync does not require accesses to all permissions of the Google account and only limits the access to the Google Drive.
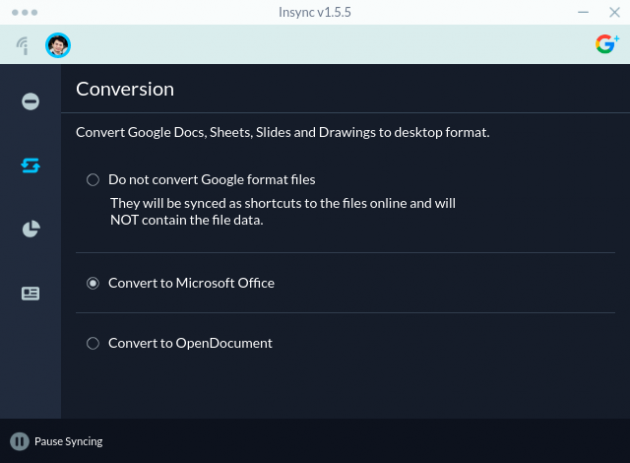
The one most important feature of Insync is that it can download a copy of the converted Office or OpenDocument files for the Google Docs/Sheets/Slides files no matter whether it is created by the account owner or shared to the account owner, and local modifications are sync’ed to the Google Drive automatically. This is a powerful feature, that enables making backup of the files in the Google Docs/Sheets/Slides created by one or shared from others, which is very unique to Insync as so far I find.
Overall, its functions deserve the one time $29.9 fee ($5 discount using this link: Insync) to me and the 15-day free trial can be used to evaluate whether the features are really useful.
Now, let’s look at how to set it up in Ubuntu 18.04.
Register an Insync account
Click Insync ($5 discount from this link).
Click the “Try free for 15 days” and login using your Google Account. After this, you Google account should be ready to use Insync.
Set up the apt repository for Insync
First, add the public GPG key to allow apt to authenticate the Insync repository.
sudo apt-key adv --keyserver keyserver.ubuntu.com --recv-keys ACCAF35C \
|| sudo apt-key adv --keyserver hkp://keyserver.ubuntu.com:80 --recv-keys ACCAF35C
Then, add the Insync repository to install the software.
Create a file `/etc/apt/sources.list.d/insync.list` with the following content
deb http://apt.insync.io/[DISTRIBUTION] [CODENAME] non-free contrib
Replace `[DISTRIBUTION]` with your Linux distro (ubuntu, debian or mint) and `[CODENAME]` with your Linux distro codename (you can get a list of Ubuntu’s codenames from this page).
For Ubuntu 18.04:
echo "deb http://apt.insync.io/ubuntu bionic non-free contrib" \
| sudo tee /etc/apt/sources.list.d/insync.list
For Ubuntu 16.04:
echo "deb http://apt.insync.io/ubuntu xenial non-free contrib" \
| sudo tee /etc/apt/sources.list.d/insync.list
For Ubuntu 14.04:
echo "deb http://apt.insync.io/ubuntu trusty non-free contrib" \
| sudo tee /etc/apt/sources.list.d/insync.list
Update the apt cache
Update the apt caches
sudo apt update
Install Insync
Now install the Insync software package
sudo apt install insync
If everything goes well, you will see output as follows.
$ sudo apt install insync
Reading package lists... Done
Building dependency tree
Reading state information... Done
The following NEW packages will be installed:
  insync
0 upgraded, 1 newly installed, 0 to remove and 184 not upgraded.
Need to get 139 MB of archives.
After this operation, 370 MB of additional disk space will be used.
Get:1 http://apt.insync.io/ubuntu bionic/non-free amd64 insync amd64 3.0.27.40677-bionic [139 MB]
Fetched 139 MB in 58s (2,404 kB/s)
Selecting previously unselected package insync.
(Reading database ... 392226 files and directories currently installed.)
Preparing to unpack .../insync_3.0.27.40677-bionic_amd64.deb ...
Unpacking insync (3.0.27.40677-bionic) ...
Setting up insync (3.0.27.40677-bionic) ...
Insync installation has finished. You may now start it.

fs.inotify.max_user_watches = 1048576
Processing triggers for shared-mime-info (1.9-2) ...
Processing triggers for gnome-menus (3.13.3-11ubuntu1.1) ...
Processing triggers for hicolor-icon-theme (0.17-2) ...
Processing triggers for mime-support (3.60ubuntu1) ...
Processing triggers for desktop-file-utils (0.23-1ubuntu3.18.04.2) ...
Processing triggers for man-db (2.8.3-2ubuntu0.1) ...
If you use Nautilus, install the integration tool so that the file and directory status can be shown in Nautilus and there are links in the context short cut menu to Google Drive and Google Docs (very useful feature if you would like to edit a document online)
sudo apt install insync-nautilus
If you are using another file manager, you may check whether Insync has plugins for your tool. So far, those listed are
insync-caja/unknown,unknown 3.0.11.40167 all
  Sync all your Google Drive & OneDrive accounts to your local filesystem

insync-dolphin/unknown,unknown 3.0.22.40446 all
  Sync all your Google Drive & OneDrive accounts to your local filesystem

insync-nautilus/unknown,unknown 3.0.23.40579 all
  Sync all your Google Drive & OneDrive accounts to your local filesystem

insync-nemo/unknown,unknown 3.0.11.40167 all
  Sync all your Google Drive & OneDrive accounts to your local filesystem

insync-thunar/unknown,unknown 3.0.23.40579 all
  Sync all your Google Drive & OneDrive accounts to your local filesystem
After Insync starts, following its GUI instructions to login your Google account(s) and authorize the accesses to your Google Drive and it will start to sync files.
If you would like Insync to convert the documents files, set the options in the “Account Settings” tools as shown in the images shown in the earlier part of this post for that Google Account (per Google Account settings) and Insync will automatically convert the document files.

